Got the new oil pan in, with the Paxton oil drain fitting. Next step is to install the Roe (via Torrie) in-tank fuel pumps. The directions are written, but no pics. I searched and did not find any pics of this install. Any one have any pics of the in tank fuel pump and where to drill the bracket to mount the primary and the second pumps and also where to drill for the wires to pass through. Any other tips for this install appreciated. Thanks, Bryan


You are using an out of date browser. It may not display this or other websites correctly.
You should upgrade or use an alternative browser.
You should upgrade or use an alternative browser.
Roe Fuel pump install pics request
- Thread starter DESRT10
- Start date
05srt10carson
Full Access Member
Got pic
Here ya go:
http://i660.photobucket.com/albums/uu326/PNYBOY/99242438.jpg
http://i660.photobucket.com/albums/uu326/PNYBOY/841d65b2.jpg
http://i660.photobucket.com/albums/uu326/PNYBOY/0284ba75.jpg
http://i660.photobucket.com/albums/uu326/PNYBOY/18190ce1.jpg
http://i660.photobucket.com/albums/uu326/PNYBOY/60f9c94d.jpg
http://i660.photobucket.com/albums/uu326/PNYBOY/8b581248.jpg
rare03srt10
Full Access Member


Here ya go:
http://i660.photobucket.com/albums/uu326/PNYBOY/99242438.jpg
http://i660.photobucket.com/albums/uu326/PNYBOY/841d65b2.jpg
http://i660.photobucket.com/albums/uu326/PNYBOY/0284ba75.jpg
http://i660.photobucket.com/albums/uu326/PNYBOY/18190ce1.jpg
http://i660.photobucket.com/albums/uu326/PNYBOY/60f9c94d.jpg
http://i660.photobucket.com/albums/uu326/PNYBOY/8b581248.jpg
Thank you very much, that helps tons.
Bryan
Thank you very much, that helps tons.
Bryan
No problem bud. It actually was not too bad. And the tank is pretty easy to take down. Hardest part was getting the damn rubber hose off of the fill tube. Shit gets stuck on there pretty good. You may want to PM Tim (Mighty1), he just did this and he may have taken some pics. See if he'll post them up. The install would have gone much easier, if I would have had a thread like this when Joe (jfireboy1) and I were doing ours.
No problem bud. It actually was not too bad. And the tank is pretty easy to take down. Hardest part was getting the damn rubber hose off of the fill tube. Shit gets stuck on there pretty good. You may want to PM Tim (Mighty1), he just did this and he may have taken some pics. See if he'll post them up. The install would have gone much easier, if I would have had a thread like this when Joe (jfireboy1) and I were doing ours.
Nope I didn't even think about taking pics. I see that you zip tied the pumps to the basket. I didn't do that because I thought the gas would eat the plastic of the ties. I hope I don't have any problems with the pumps not being tied down. They can't really move any but the are touching each other.
yellowfever#154
Full Access Member
You can run a external pump, but would require a fuel cell or modifying the factory tank to be able to pull fuel from the bottom of the tank.
I am in the middle of this project this weekend. I dropped the tank out yesterday and took some pics of the fuel pump basket to post later. Let the JB weld cure (to seal the wire holes in the top) overnight and hope to finish today. Dropped the tank by myself in the garage, using a jack to lower it, it was much lighter than I thought. The biggest job was cleaning the top of the fuel pump module before taking it off the tank. All those little pockets in the top of the module hold a lot dirt in small places. Air compressor helped a lot.
One potential show stopper, to complete this today. I could not get the main fuel line plastic quick release clip out without breaking it. The was postioned in such a way that I could not moves the tabs on the clip, so had to pry it out top and break it in the process.
The fuel line clips in the Roe kit did not fit my line. I think my line is stock, but I suppose the potential is there that I have a replacement line or something. Advance Auto or O'Reillys have them in stock in the isle by the Company Dorman in bright yellow packs. But not not under Dodge/Chrysler. Ford/GM "5/16 and 3/8 Fuel Line Connector Clips", pt #800-023, about $4 for a pack of 6. The 5/16ths piece was exact same as came out, whew.
:rock::rock::rock:
Dorman & there is another company that sells those small parts, gots to have small parts that will screw up some simple plans/jobs.
:rock::rock::rock:
ask me how i know, lol:aetsch:
Dorman & there is another company that sells those small parts, gots to have small parts that will screw up some simple plans/jobs.
:rock::rock::rock:
ask me how i know, lol:aetsch:
V10SC_V12TT
New Member
I am in the middle of this project this weekend. I dropped the tank out yesterday and took some pics of the fuel pump basket to post later. Let the JB weld cure (to seal the wire holes in the top) overnight and hope to finish today. Dropped the tank by myself in the garage, using a jack to lower it, it was much lighter than I thought. The biggest job was cleaning the top of the fuel pump module before taking it off the tank. All those little pockets in the top of the module hold a lot dirt in small places. Air compressor helped a lot.
One potential show stopper, to complete this today. I could not get the main fuel line plastic quick release clip out without breaking it. The was postioned in such a way that I could not moves the tabs on the clip, so had to pry it out top and break it in the process.
The fuel line clips in the Roe kit did not fit my line. I think my line is stock, but I suppose the potential is there that I have a replacement line or something. Advance Auto or O'Reillys have them in stock in the isle by the Company Dorman in bright yellow packs. But not not under Dodge/Chrysler. Ford/GM "5/16 and 3/8 Fuel Line Connector Clips", pt #800-023, about $4 for a pack of 6. The 5/16ths piece was exact same as came out, whew.
You should consider using 'Stepless Ear Clamps' or Fuel Injection clamps, NOT hose clamps. Hose clamps damage the hose and could pop-off under pressure. Good luck with your install!
You should consider using 'Stepless Ear Clamps' or Fuel Injection clamps, NOT hose clamps. Hose clamps damage the hose and could pop-off under pressure. Good luck with your install!
Agree, ROE had these good fuel injection clampes included in their kit. Thanks, I finished and tested everything on sunday. So far, so good. Glad to have that job done. Will post some pics later this week.
Actually I had two external walbaro with an external regulator on mine that didn't require anything but power and connecting them inline with the stock fuel line. It's the set up that the Paxton comes with. I had to change mine out cause it was inadequate for my twin turbos. I still have them if interested.
McLuvin
Full Access Member
How does the Roe kit regulate pressure? I understand the second pump is powered under boost, but what regulates pressure?
How does the Roe kit regulate pressure? I understand the second pump is powered under boost, but what regulates pressure?
The fuel pressure regulator is in the top of the factory basket. So, both pumps get installed inside the basket, before the fuel pressure regulator. System works very well. My fuel pressure stays solid at 60psi, through the entire boost range. And I still have plenty of fuel left over, if I want to go into the 12lb boost level, once the motor is built.
McLuvin
Full Access Member
Awesome. I asked if we could do that nearly 2 years ago and got a solid no. I have been under the impression I needed to build a complete fuel system. Who has the pullies to get to 12 PSI these days?
Awesome. I asked if we could do that nearly 2 years ago and got a solid no. I have been under the impression I needed to build a complete fuel system. Who has the pullies to get to 12 PSI these days?
Bobby is running tony's lower pulley and a different pulley on the head unit and he's making a little over 12 lbs. Tony's pulley alone will get u to 10lbs. But, you may want to contact Tim (Mighty1). He's almost done with his seperate belt drive system and supposedly it will be making more boost.
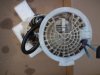
Here are a few pics from my install and some hints that hopefully help the next person to do this install.
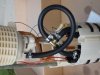
Pic 1 show final installed pumps. The primary pump is on the left with straight thru flow in the brass T fitting. The secondary (boost activated pump) comes in from the 90 degrees as per Roe instructions. The wires to the primary pump did have to be reversed as the stock positive and neg leads are opposite what the Walbro pumps are. I did test runs of the stock and both Walbro pumps to ensure I had the leads right and that they pumped the right direction when installed (fun). Otherwise this lead plugs right in. The wire to the secondary pump are hidden in this picture. I used the stock flew fuel tube as a sleeve for them, to protect from rubbing on other parts (not sure if necessary, but was easy to do). The kit wires for the secondary pump are barely long enough to make it through the top and to the pump. When putting the upper and lower modules together the springs in the spread the top an bottom plastic modules apart, so the wires were under some tension then and had to be carefully handled, but did have slack at installed height. I did buy a coil of 12 guage wire to run from this connector to the power lead in the engine comparment.
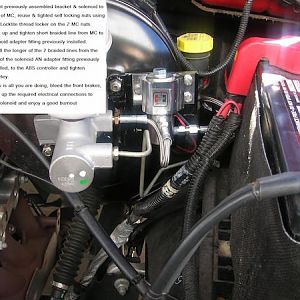
Pic 2 show two things. I installed the wire next to the stock wire connector port. I wanted them to be close. If did it again, would have move them back one slot on the plastic, as mine are close to the metal ring that goes back on to hold this whole module in the tank. I had to JB weld the wires to the back end of the slot I used so they don't touch or rub on that metal ring. Good thing I used the ring to figure this out in the dry assembly, other wise would have had to pull the wires out and redo them (there are 2 wire leads in the kit, so this would have been possible. I did go buy some marine grade connectors. This has shrink tubing with adhesive on the inside to ensure a good seal and higher grade metal connectors inside. Use the best wire crimper you can afford here. I didn't want any possibility of exposed wire near the fuel tank. I usually solder my wiring, but there was barely enough lead sticking out of the module to do this. The second thing to show is how the fuel sock filters are clocked. I thought this was important as there are 2 semi circle humps in the bottom of the tank that surround the pump module. clocked the filters to fit the only way I could to make them sit at the actual bottom of the tank and not on one of these humps. To orient to position, the stock wire connector port faces directly towards the front of the truck as installed.
Pic 3- This is only to show some grinding I had to do on the plastic arm of the fuel level sender to clear the secondary pump. This is so this arm did not collide with the pump as the arm moves up and down. This could have been avoided if the pump was moved over, but I wanted the pumps installed where I had them.
Big thanks to Sean at Roe Racing to getting me some quick answers when I was just starting this install. I have been very impressed with all the vendors I have worked with in this SRT community. Great place to be.
Pic 1 show final installed pumps. The primary pump is on the left with straight thru flow in the brass T fitting. The secondary (boost activated pump) comes in from the 90 degrees as per Roe instructions. The wires to the primary pump did have to be reversed as the stock positive and neg leads are opposite what the Walbro pumps are. I did test runs of the stock and both Walbro pumps to ensure I had the leads right and that they pumped the right direction when installed (fun). Otherwise this lead plugs right in. The wire to the secondary pump are hidden in this picture. I used the stock flew fuel tube as a sleeve for them, to protect from rubbing on other parts (not sure if necessary, but was easy to do). The kit wires for the secondary pump are barely long enough to make it through the top and to the pump. When putting the upper and lower modules together the springs in the spread the top an bottom plastic modules apart, so the wires were under some tension then and had to be carefully handled, but did have slack at installed height. I did buy a coil of 12 guage wire to run from this connector to the power lead in the engine comparment.
Pic 2 show two things. I installed the wire next to the stock wire connector port. I wanted them to be close. If did it again, would have move them back one slot on the plastic, as mine are close to the metal ring that goes back on to hold this whole module in the tank. I had to JB weld the wires to the back end of the slot I used so they don't touch or rub on that metal ring. Good thing I used the ring to figure this out in the dry assembly, other wise would have had to pull the wires out and redo them (there are 2 wire leads in the kit, so this would have been possible. I did go buy some marine grade connectors. This has shrink tubing with adhesive on the inside to ensure a good seal and higher grade metal connectors inside. Use the best wire crimper you can afford here. I didn't want any possibility of exposed wire near the fuel tank. I usually solder my wiring, but there was barely enough lead sticking out of the module to do this. The second thing to show is how the fuel sock filters are clocked. I thought this was important as there are 2 semi circle humps in the bottom of the tank that surround the pump module. clocked the filters to fit the only way I could to make them sit at the actual bottom of the tank and not on one of these humps. To orient to position, the stock wire connector port faces directly towards the front of the truck as installed.
Pic 3- This is only to show some grinding I had to do on the plastic arm of the fuel level sender to clear the secondary pump. This is so this arm did not collide with the pump as the arm moves up and down. This could have been avoided if the pump was moved over, but I wanted the pumps installed where I had them.
Big thanks to Sean at Roe Racing to getting me some quick answers when I was just starting this install. I have been very impressed with all the vendors I have worked with in this SRT community. Great place to be.
Attachments

Support Us
Become A Supporting Member Today!