moparracing
Full Access Member
ok, i got 'em, but have a few questions.....
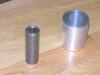
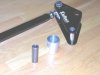
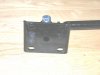
the instructions are very general, do you remove the stock "traction bar/slapper bar" & install the caltracs basically in place of ?
do you need any extra parts not included in the kit ?
did anyone do an install thread with pics on these ? i couldn't find it.....
how do you "preload" them & what's a good setting for track/street applications ?
thanks in advance, you guys are da best....:rock: