JMB CAI Install complete, Thanks Justin

JimTeTe

Active Member
Supporting Member
Joined
Apr 14, 2007
Messages
2,281
Reaction score
0
Location
Connecticut
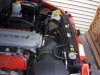
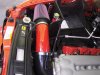
Just wanted to post a few pics on the new JMB CAI installation we did today. The instructions are right on the money, I had to make sure to read thoroughly, there are a few lines and hoses you really don't want to get mixed up. I used a suggestion by another member, Kevin I think it was on the re-routing of the drain tube on top of the radiator. All worked out very well thanks to all for comments on the before installation thread and Thanks to Justin for Quality workmanship and great service. I mean the guy sent me his cell phone number in case I needed some help, he won me over.

Jim
 

Attachments

  • HPIM0334small.jpg
    HPIM0334small.jpg
    95.7 KB · Views: 124
  • HPIM0341small.jpg
    HPIM0341small.jpg
    86 KB · Views: 185
  • HPIM0342small.jpg
    HPIM0342small.jpg
    69.9 KB · Views: 137
  • HPIM0338small.jpg
    HPIM0338small.jpg
    96.9 KB · Views: 167
I must be retarded.. Or too cautious. I need step by step pictures to install mine. Are there any around here?
 
No pictures Antnee but I can give you the steps I used.

Step 1 Open Hood
Step 2 Remove factory CAI
Step 3 Install JMB CAI
Step 4 Close hood.

:rock: :rock: :rock: :rock: :burnout: :burnout: :burnout: :burnout: :burnout:
 
Venom Power said:
I must be retarded.. Or too cautious. I need step by step pictures to install mine. Are there any around here?

Once you get past the hoses it's not bad, except maybe getting the old sensor in and out of the old and new breathing hose. I gave mine a slight little slice so I wouldn't brake the Damn thing.

Jim
 
:rolleyes:Great pointers Jack. That about sums it all up, doesn't it?:laugh:

I got it done finally. Them damn spring loaded clamps.. MAN I hate 'em.. I got some regular clamps to hurry it all along. I'll post up some pictures tomorrow when it's sunny out. Besides since she hadn't been driven in 6 1/2 weeks she's not really decently cleaned (and I KNOW I will get reemed for it in here, so I'll save the ass chapping)..

Thanks again Justin.
 
Ya know what? Those without sin cast the first stone. Dirty or not, here's some pictures of the engine bay so far..

Toys010.jpg


Toys011.jpg


Toys012.jpg


Toys013.jpg


Toys014.jpg


The chosen color schemes match the wheels quite well.
VTCoA160.jpg


Next will be the hard radiator pipes (which I forgot to install), polished intake manifold and Basanni headers.
 
Looks great ANT! I'm diggin the chrome on the valve covers! And Jim! Clean! Looks awesome!
 
FATJACK said:
Looks great Buddy, sorry about the smart ass comments, I'm just old and grouchy..


No need to apologize for being old and grouchy Jack. The smart ass comments are to be expected when your wood isn't petrified anymore..:D Hell that'll be my :dontknow: dilemma soon...
 

Latest posts

Support Us

Become A Supporting Member Today!

Click Here For Details

Back
Top