Powder coating Help

Kopack_05

Full Access Member
Joined
May 22, 2014
Messages
155
Reaction score
0
Location
Florida
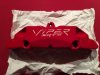
So, I finally got around to redoing a set of brake calipers. I have never powder coated before, so I thought I'd give it a try.

I'm using summit powder red and clear. Both cure time/temps the same. 392F for 8 minutes when part reaches temperature.

I have smoothed and totally cleaned/outgassed calipers.
I sprayed the red and cured for 5 minutes.
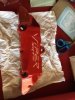
I applied the white high temp viper decals.
I sprayed the clear and cured for the full 8 minutes.

The problem occurred during the last minute of cure time. The white decals turned slightly pink.

Is this an issue with the decal? Or should I have cured the red a little longer? Or is this the nature of the beast?

Thanks for the help!
 
Ive been powder coating for a while lets see if I can help you. So first red bleeds into everything and should be fully cured before any other color applied with it. Second the decals are usually used as stencils and not meant to be coated over. So you should have done white first covered with decals. Then red till flowout wait slightly to cool then pull decals and back in the oven for full cure. Sucks to have to strip them now powder is a bitch to get off.

If they were mine I would have just done the red and used the white decals they hold up fine.
 
Not to good, I tried 2 test pieces.
1st test piece I pulled the part right at flow out and tried to pull one letter. Decal was way to hot and just shredded into pieces and left a frayed edge. I then let the part cool and pulled another letter. Decal still frayed at the edges. I gave it a quick wet sand to try and clean up the edges, which worked, but damaged the red coat, and showed after I applied the clear.

2nd test piece I pulled the part just as it was starting to flow. pulled the decals, which pulled clean, but after I put the part back in for full cure, the edges were wavy and looked like I drew them on with nail polish.

I think if the decals were made of different material, say like the high temp tape, the first try would have worked well.

I attached a picture of the first attempt of the caliper that I cleared over the decal. The more I look at it, may not be too bad.

Thanks
 

Attachments

  • Caliper_fail.JPG
    Caliper_fail.JPG
    19 KB · Views: 22
question....

how did ya get the "allen head" bolts, for lack of a better word, out???

i know they are pad guides, lol.
 
I drilled out the spring pin. Then heated up the guide with a torch and used an impact gun. Came right out.

If you try and remove the guide without removing the spring pin, you will destroy the threads on the guide.
 
Update

I found a tutorial online, which advised to remove the decals/stencil at a much lower temperature 190/200. which I did on a few test pieces and this turned out perfect.

When I went to the caliper to repeat the process, by time I got all the inside corners, the area around the decals had a little too much build up. During the baking process the edges ran a little into the white lettering area. I should have dusted off the decals and re-shot a lighter coat of red to avoid the build-up around the decal.

Here is the result------not perfect, but acceptable.
 

Attachments

  • IMG_2023.JPG
    IMG_2023.JPG
    92.4 KB · Views: 23
Never done it myself, so hats off to you for doing it and doing it well.

Good job Sir! :D
 
Looks pretty awesome for just stepping into coating!! doing a 2-tone like that is a lot of work.
 

Latest posts

Support Us

Become A Supporting Member Today!

Click Here For Details

Back
Top