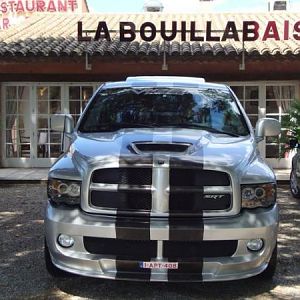
1000hpOdyssey
Full Access Member
- Joined
- Jan 4, 2007
- Messages
- 138
- Reaction score
- 0
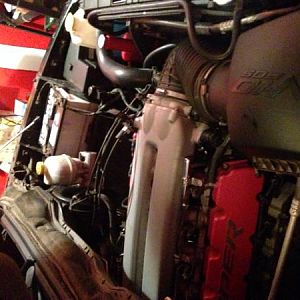
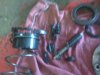
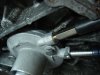
I recently installed a McLeod twin disc Meba lined clutch to get the truck ready for the blower that Justin will be installing shortly. Actually, my time line on installing the McLeod was advanced due to my Centerforce piece of crap failing after less than 2,000 miles (and no drag racing). When the Centerforce was installed I also installed the upgraded Viper slave and master cylinder. I thought that the upgraded Viper slave and master would work just fine with the McLeod since Dom had ran that set up with his monster truck. I was not as lucky as Dom. After less than 100 miles the upgraded Viper slave went to pieces. See attached pictures. The plastic collar that holds the throw out bearing must have overheated causing the plastic to get brittle and break into 10 to 12 pieces. The shim at the back of the candle stick, and the candle stick itself practically welded itself to the shaft.
I figured that the McLeod was just too stout for the upgraded Viper slave so I ordered the McLeod slave. Big mistake. The McLeod slave is a bear to space properly. It is not attached to the transmission and the only thing that keeps it from spinning is the hydrolic lines. The spacing is done with a screw out collar that does not even have a set screw to keep it where you place it. After being off and on several times and speaking with McLeod, they said you need to change out the master cylinder to make it work properly because the fluid hydrolics of the McLeod slave are different from the Viper slave. I then spoke with several highly competent mechanics that confirmed that even the slightest change in volume of hydrolic fluid, length of hose ect. will change up the pressure in the lines. Long story short, I blew out one of the O rings in the McLeod slave trying to make it work and never got it right. IMHO the McLeod slave should be avoided, unless you have a lot of time to play around with it and do not mind taking the transmission out numerous times. IMHO, you would also need to cut an inspection hole in the bell housing so you could see what was going on during the set up.
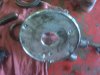
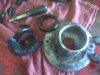
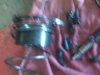
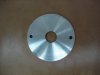
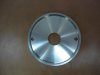
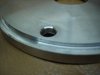
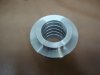
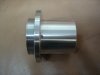
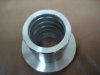
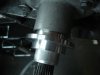
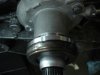
Final solution, a friend of mine, Greg Good (Greg Good Cylinder Heads in Houston) made a new spacer and a new part to replace the plastic collar in the upgraded Viper slave. See pictures attached. This part is pretty trick. Greg machined it out of aluminum. It has multiple grease grooves on the inside of the collar with an O ring on the end to keep the grease from coming out. It also has a small lip on the end to keep the throw out bearing from coming off. He also machined a proper spacer with grooves on both sides to seat properly against the transmission and the candle stick. We also did away with the Dodge spring. It seems like all it does it keep the throw out bearing and plastic collar up against the clutch fingers to keep the rattling down. With a precision made aluminum part, you do not get any rattling, therefore, you do not have to have the throw out bearing resting against the clutch fingers. That just wears them out prematurely.
The piece works great. Shifts great. Stock pedal height. A little stiffer than stock, but that is due to the McLeod clutch. :rock: :rock:
Sorry I could not get the pictures to line up in order. You guys will just have to go through them out of order. Hopefully you will be able to figure things out from the narrative description. I attached a lot of pictures. I hope they made it through the server and got attached. I know this thread is worthless without pictures.
Special thanks to Greg Good for bailing me out of this jam.
I figured that the McLeod was just too stout for the upgraded Viper slave so I ordered the McLeod slave. Big mistake. The McLeod slave is a bear to space properly.
It is not attached to the transmission and the only thing that keeps it from spinning is the hydrolic lines. The spacing is done with a screw out collar that does not even have a set screw to keep it where you place it. After being off and on several times and speaking with McLeod, they said you need to change out the master cylinder to make it work properly because the fluid hydrolics of the McLeod slave are different from the Viper slave. I then spoke with several highly competent mechanics that confirmed that even the slightest change in volume of hydrolic fluid, length of hose ect. will change up the pressure in the lines. Long story short, I blew out one of the O rings in the McLeod slave trying to make it work and never got it right. IMHO the McLeod slave should be avoided, unless you have a lot of time to play around with it and do not mind taking the transmission out numerous times. IMHO, you would also need to cut an inspection hole in the bell housing so you could see what was going on during the set up.Final solution, a friend of mine, Greg Good (Greg Good Cylinder Heads in Houston) made a new spacer and a new part to replace the plastic collar in the upgraded Viper slave. See pictures attached. This part is pretty trick. Greg machined it out of aluminum. It has multiple grease grooves on the inside of the collar with an O ring on the end to keep the grease from coming out. It also has a small lip on the end to keep the throw out bearing from coming off. He also machined a proper spacer with grooves on both sides to seat properly against the transmission and the candle stick. We also did away with the Dodge spring. It seems like all it does it keep the throw out bearing and plastic collar up against the clutch fingers to keep the rattling down. With a precision made aluminum part, you do not get any rattling, therefore, you do not have to have the throw out bearing resting against the clutch fingers. That just wears them out prematurely.
The piece works great. Shifts great. Stock pedal height. A little stiffer than stock, but that is due to the McLeod clutch. :rock: :rock:
Sorry I could not get the pictures to line up in order. You guys will just have to go through them out of order. Hopefully you will be able to figure things out from the narrative description. I attached a lot of pictures. I hope they made it through the server and got attached. I know this thread is worthless without pictures.
Special thanks to Greg Good for bailing me out of this jam.
Attachments
-
 IMG00175.jpg623.3 KB · Views: 404
 -
 IMG00174.jpg571.2 KB · Views: 414
 -
 IMG00173.jpg488.8 KB · Views: 352
 -
 IMG00172.jpg457.2 KB · Views: 271
 -
 Greco slave cylinder parts 001.jpg1.3 MB · Views: 348
 -
 Greco slave cylinder parts 002.jpg1.2 MB · Views: 476
 -
 Greco slave cylinder parts 003.jpg988.8 KB · Views: 289
 -
 Greco slave cylinder parts 004.jpg1.1 MB · Views: 301
 -
 Greco slave cylinder parts 005.jpg1 MB · Views: 324
 -
 Greco slave cylinder parts 006.jpg1,018.5 KB · Views: 340
 -
 Greco slave cylinder parts 007.jpg1.2 MB · Views: 1,141
 -
 Greco slave cylinder parts 008.jpg1,016.7 KB · Views: 405
 -
 Greco slave cylinder parts 010.jpg1.3 MB · Views: 617
 -
 Greco slave cylinder parts 011.jpg976.5 KB · Views: 462