2005ViperRam
Well-Known Member
- Joined
- Oct 13, 2012
- Messages
- 224
- Reaction score
- 432
I am now in the process of flipping my leaf spring from the bottom to the top (reverse lowering) on my 2005 QC.
Since I have to basically disconnect everything I thought I’d do the rotors also. What a pain! I spent 5 hours beating
the rotor hat (the area between the 5 wheel studs) with a 4 lb hammer and it didn’t even budge. The rotor was rusted on.
Getting to the point of getting ticked off and thinking of just having a mechanic do it, I gave it one last shot and gave up
my man card and started Googling the web for answers. Believe it or not, Google brought me right back to this website. Reading
a post from 2011 got me where I think I need to be (I will try it tomorrow and let you know how it goes).
Basically what the post says is to get the following items:
As per this video:
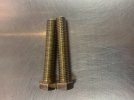
1 - 1/2 in x 3 inch Grade 8 bolt
4 - large flat washers
4 - 1/2 inch Grade 8 nuts
1 - open end wrench
1 - socket
Supposedly within 10 minutes it should come right off, from what people are saying in the comment section of the video.
Here is the post that refers the above info, which is from this website:
 www.vtcoa.com
The add-on I wanted to say is:
- make sure you put some lug nuts on because the rotor might fly off. This should save you from possibly getting killed.
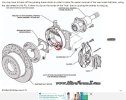
- being a Dana 60, I assume both tires need to be off the ground to be able to rotate the rotors (I think).
- the nut that is against the rotor is manly used so you don’t mess up the threads of the bolt, so you can get it off.
- make sure you follow the directions about loosening the drum brake which rides insides the rotor.
I’ll give you an update how it worked…
Since I have to basically disconnect everything I thought I’d do the rotors also. What a pain! I spent 5 hours beating
the rotor hat (the area between the 5 wheel studs) with a 4 lb hammer and it didn’t even budge. The rotor was rusted on.
Getting to the point of getting ticked off and thinking of just having a mechanic do it, I gave it one last shot and gave up
my man card and started Googling the web for answers. Believe it or not, Google brought me right back to this website. Reading
a post from 2011 got me where I think I need to be (I will try it tomorrow and let you know how it goes).
Basically what the post says is to get the following items:
As per this video:
4 - large flat washers
4 - 1/2 inch Grade 8 nuts
1 - open end wrench
1 - socket
Supposedly within 10 minutes it should come right off, from what people are saying in the comment section of the video.
Here is the post that refers the above info, which is from this website:
Removing Stuck Rear Brake Rotors
Since so many have answered my questions when I was in need of advice or assistance I feel the need to give back a little. I am not sure if this is the right spot for this so I am sure the Admins will move this thread if necessary. I spent about 8 hours working on this today because I did not...
The add-on I wanted to say is:
- make sure you put some lug nuts on because the rotor might fly off. This should save you from possibly getting killed.
- being a Dana 60, I assume both tires need to be off the ground to be able to rotate the rotors (I think).
- the nut that is against the rotor is manly used so you don’t mess up the threads of the bolt, so you can get it off.
- make sure you follow the directions about loosening the drum brake which rides insides the rotor.
I’ll give you an update how it worked…