azpyroguy
Full Access Member
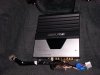
Here are some pics of the new amp and sub that I installed, along with the wiring info in case anyone cares to do it themselves. :rock:
2006 RAM SRT10, replace stock sub amp, with new better, more powerful unit.
Wiring Codes for plug under drivers seat.
Red = 12v Pos (allways hot)
Black = 12v Neg
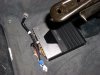
Pink/Yellow = This is supposed to be the remote turn on, but when radio is on, its 12.5volts, and when its off its about 11volts, so I had source another wire under the dash for remote turn on... behind the e-brake pedal is a group of wires, one of them is PINK, that is a ignition hot wire, that I used for my remote turn on... so the amp turns on whenever the car is running.. not ideal.. but best I could do.
Gray/Orange - Speaker Level + (SUB from deck/EQ)
Green/Orange - Speaker Level - (SUB) from deck/EQ)
The other 4 wires, in the middle of the connector go to the stock sub, which was a dual voice coil, and I am not using, as I replaced with a single 10 guage, wire from my Mono Alpine MRD-300 Amp, to a Alpine Type R-10, dual voice coil sub, that I wired in series (dual 4 ohm coils)
Caveats:
The front seats are welded together in middle under center console, which was a PIA!!! to work with... had to remove the center console mostly and unbolt all 8 bolts that held down both seats, and tip back the seat. The rear bolts were son-of-b's to break loose!!! Broke 2 sockets, 1 ratchet, and a 3/8 impact would not break loose... took me like 3 hours to remove the 4 bolts, along with various colorful metaphors...
PS - you dont need to remove the center console between seats (I learned this the hard way!!), just remove the carbon fiber cover up front, its held down with 4 snap clips, be carefule when removing!!! then under that are 3 bolts that hold that piece to the floor, once you have that up, and the 8 bolts removed you can tip the entire seat set back. Dont forget to unplug the wires from beneath both seats!!!
Here are the pics:
2006 RAM SRT10, replace stock sub amp, with new better, more powerful unit.
Wiring Codes for plug under drivers seat.
Red = 12v Pos (allways hot)
Black = 12v Neg
Pink/Yellow = This is supposed to be the remote turn on, but when radio is on, its 12.5volts, and when its off its about 11volts, so I had source another wire under the dash for remote turn on... behind the e-brake pedal is a group of wires, one of them is PINK, that is a ignition hot wire, that I used for my remote turn on... so the amp turns on whenever the car is running.. not ideal.. but best I could do.
Gray/Orange - Speaker Level + (SUB from deck/EQ)
Green/Orange - Speaker Level - (SUB) from deck/EQ)
The other 4 wires, in the middle of the connector go to the stock sub, which was a dual voice coil, and I am not using, as I replaced with a single 10 guage, wire from my Mono Alpine MRD-300 Amp, to a Alpine Type R-10, dual voice coil sub, that I wired in series (dual 4 ohm coils)
Caveats:
The front seats are welded together in middle under center console, which was a PIA!!! to work with... had to remove the center console mostly and unbolt all 8 bolts that held down both seats, and tip back the seat. The rear bolts were son-of-b's to break loose!!! Broke 2 sockets, 1 ratchet, and a 3/8 impact would not break loose... took me like 3 hours to remove the 4 bolts, along with various colorful metaphors...
PS - you dont need to remove the center console between seats (I learned this the hard way!!), just remove the carbon fiber cover up front, its held down with 4 snap clips, be carefule when removing!!! then under that are 3 bolts that hold that piece to the floor, once you have that up, and the 8 bolts removed you can tip the entire seat set back. Dont forget to unplug the wires from beneath both seats!!!
Here are the pics: