You are using an out of date browser. It may not display this or other websites correctly.
You should upgrade or use an alternative browser.
You should upgrade or use an alternative browser.
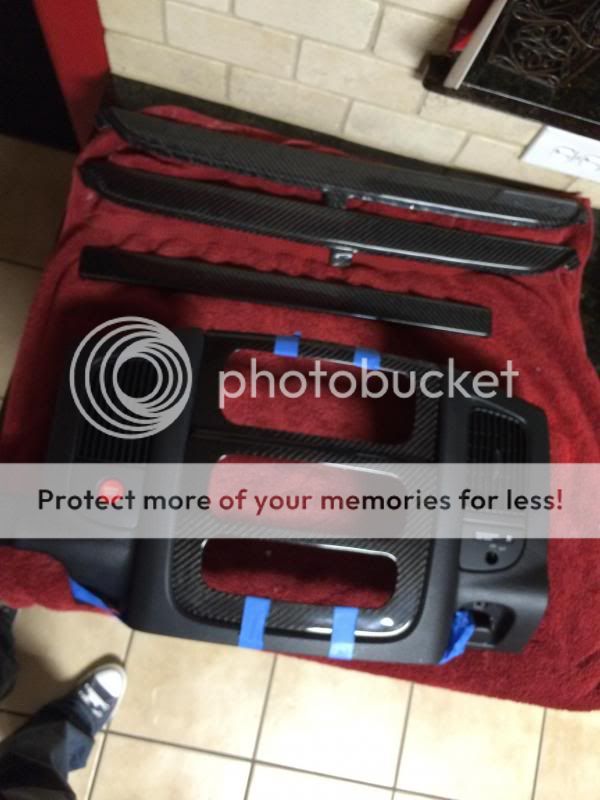
Carbon fiber trim and suede(fake stuff) headliner...
- Thread starter s4twin
- Start date
That looks great! Where did you get the stuff to do that?
I noticed you dyed the a-pilar pieces and the back of the cab also.
Sent from my iPhone using Tapatalk 2
I noticed you dyed the a-pilar pieces and the back of the cab also.
Sent from my iPhone using Tapatalk 2
bmxam962
Full Access Member
Interior looks sweet. Good work
DallasSRT10
Full Access Member
Am I the only one who noticed it says "awesome" on the deck/radio?
Am I the only one who noticed it says "awesome" on the deck/radio?
nope:rock:
The carbon fiber fabric was bought on ebay. As for the epoxy/hardener, I went with west system and bought that from Discount Marine, Ships chandlers, boat supplies, inflatable boats, electronics, hardware and everything else. I went with 105a resin and 207 hardener.
I did paint the a-pillar trim, sunvisor holders and trim, overhead display, rear dome light and rear trim as well.... I just goggled around and ended up following one of Stacey David's tutorials.
I did paint the a-pillar trim, sunvisor holders and trim, overhead display, rear dome light and rear trim as well.... I just goggled around and ended up following one of Stacey David's tutorials.
Last edited:
Wastelands Warrior
Full Access Member
Sweet!
The carbon fiber fabric was bought on ebay. As for the epoxy/hardener, I went with west system and bought that from Discount Marine, Ships chandlers, boat supplies, inflatable boats, electronics, hardware and everything else. I went with 105a resin and 207 hardener.
thats what ya used for protection & depth???
the epoxy/resin is used to hold the carbon fiber down(glue it down), then multiple lite coats were applied to ensure complete coverage. That was all sanded down with 180-250-320-400-600, then 4-5 coats of u-pol #1 clear coat was added. Clear coat was wet sanded with 800-1000-1500-2000, then buffed with some 3m compound, then polish with some Nu Finish car polish. In a couple of weeks I'll wax all the trim pieces. My understanding is that the epoxy/resin has to "air out" or something like that, which can take a couple of weeks to be 100% cured.
the epoxy/resin is used to hold the carbon fiber down(glue it down), then multiple lite coats were applied to ensure complete coverage. That was all sanded down with 180-250-320-400-600, then 4-5 coats of u-pol #1 clear coat was added. Clear coat was wet sanded with 800-1000-1500-2000, then buffed with some 3m compound, then polish with some Nu Finish car polish. In a couple of weeks I'll wax all the trim pieces. My understanding is that the epoxy/resin has to "air out" or something like that, which can take a couple of weeks to be 100% cured.
That sounds like A LOT of work....
That's some serious patience. I won't do painting precisely because of that.
BAD SNAKE
Full Access Member
Nice work I have a few questions for ya hit me up when you have time. [email protected] or 410-739-2508 cheers J
jtotin
New Member
How did you remove the door trim and air bag trim pieces? I do hydro dipping and just haven't tried to remove them from the trucks so I can dip them. Any info?
airbag trim...
i taped around the trim using blue painters tape just to protect. then i used a small knife, the size of a steak knife, and stuck it in between the trim and dash. with a hammer i just hit the knifes unsharp side and broke the tabs, easily broke all the tabs(about 10-12, maybe more). I used JB plastic weld, the putty stuff, to secure back into place.
for the door trim, you have to take the whole door trim off. on the back side you with see some plastic rivets, that line up with the silver trim. drill those out, about three of them. You'll have to drill an additional 2-3 more that are located on the ends of the door trim, just drill one at a time and pull on it. i didn't use anything to secure them back into place, its a tight fit.
Last edited:
ViperCLKGTR
Active Member
- Joined
- Jun 3, 2012
- Messages
- 1,092
- Reaction score
- 9
That is amazing work and have dreamed of doing something very similar to mine BUT
I do not have anywhere near the patience or steady hands for that
I do not have anywhere near the patience or steady hands for that
Looks great!
What color paint did you use on the A-pillar?
And where did you get the suede?
What color paint did you use on the A-pillar?
And where did you get the suede?
10-1=9
Full Access Member
Looks great!
What color paint did you use on the A-pillar?
And where did you get the suede?
I'm also interested in where you got the paint. Someone did that exact same thing to my interior (minus the carbon fiber pieces) some time before I bought the truck. A & B pillar trim is the exact same color as the dash. Like to touch up some small spots whare the paint came off.
SRT-10 Ralph
Full Access Member
That looks Awesome!
10-1=9
Full Access Member
O yea forgot to say it looks awesome! It was one of the things that sold me on my truck. No gack off white color.
A pillar...
Thanks for the comments. It really isn't hard to do the carbon fiber overlaying. I'm probably going to redo the carbon fiber overlay, there is a couple of spots where I can see the original silver. This time I'm going to put 3 layers of fabric.
For the pillar's I used the duplicolor vinyl & fabric spray paint from autozone.
The headliner was taken to a local shop, not sure where the suede comes from.

Support Us
Become A Supporting Member Today!









![SRT 10%20Ralph 1415 2[2]](/data/xfmg/thumbnail/3/3170-3ea42cf90a97d1a97f2081c095c67fbb.jpg?1712488365)
