Check out this Photo editing ...

SRT10VENOMOUS

1800HP Club. And climbing
Supporting Member
Joined
May 18, 2006
Messages
6,034
Reaction score
44
Location
Vancover BC Canada
This is not my work or my pics,, But they are certainly cool. would like to see someone do a few of these with the srt


http://i112.photobucket.com/albums/n193/tonyranieri/Post%20Mods/Foliage037_8_9_tonemapped.jpg?t=1277436586http://i112.photobucket.com/albums/n193/tonyranieri/Album

/Foliage128_29_30_tonemapped.jpg?t=1277435790


IMG_2299_5_6_7_8.jpg
 
Last edited:
********I've added a more detailed how-to further down the page******

I wanted to make a quick how-to for HDR pictures... Im definitely not an expert on this so if anyone would like to add anything please do!

So first of all, the program I used was called Photomatix (here is a link to a free trial version I found: http://www.hdrsoft.com/download.html) and to put very simply, you take a shot of the bike (or whatever your subject is) in multiple exposures--I find 3 works pretty well--one at normal exposure, one that is brighter (overexposed) and another that is darker (underexposed). Obviously you will want to do this with a camera stand so to get the pictures to be fairly similiar. Then you basically put these in the program and voila you get the HDR pic.. Definitely this is an over simplification as there are other things you may want to do such as adjusting the contrast/hue with photoshop or something and not to mention take a good picture of the bike to begin with..
But this is a basic overview to how I made this particular picture of my bike..
9ad1zt.jpg


Also, you could technically do this with just one picture by using photoshop to make three different versions of the same one by altering the contrast--the original, a darker one, and a lighter one. I did that for these:
24y76z9.jpg

mncw0.jpg

34pht91.jpg

29e3g9e.jpg


Here is a youtube vid I found that may be somewhat helpful: Photomatix Tutorial for Windows
DQ | by Aeva


(not mine btw). Some pictures come out better than others so it's worth experimenting.. Let me know if any one has any questions or any pics they'd like me to do the HDR effect on.
 
Ok so i had a little extra time and thought I'd add to the how-to:

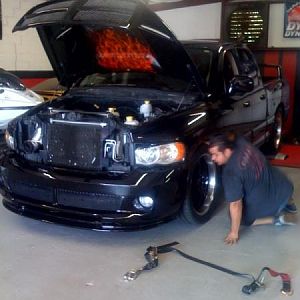
First of all, you will need at least three pictures of differing exposures to get all the detail from the picture. I usually use jpegs that are about 2000x 1333 and if they are larger I shrink them to that size before proceeding--I personally dont need them any larger than that and the hdr's dont come out right if the pictures are too small. Here are the four that I used.
snny2v.jpg


Next, assuming you have the photomatix program the starting point that I usually have the settings at are as follows:

strength=100
color saturation=40
light smoothing=very high
luminosity=+10
white point=+2.846
black point=+4.012
gamma=1.10
temperature=+5
microcontrast=+10
microsmoothing=0
highlight smoothing=default
shadow smoothing=default
shadow clipping=default
saturation highlights=default
saturation shadows=default.
and dont tick 360 degree view.

start with this and try changing each one indiviually to see how they affect the picture (note that the final product may be a little different than the preview image).


next put them in with the above settings and create the HDR. Once I have the hdr picture, I like to stick the picture in photoshop and tweak the hue/saturation slightly to bring out the colors I want and finally, the brightness and contrast to really make the picture pop out. Hope this does a little more in helping those who had trouble with this.. Here's my final product:

2mqwb4y.jpg


again, I'm no pro at this so if anyone has any other advice or corrections, please chime in!
 
I have a guy that I work with that was describing how he does this.
He usually goes walking around downtown with a tripod snapping pics. The cars and bikes look awsome. :rock:
 

Latest posts

Support Us

Become A Supporting Member Today!

Click Here For Details

Back
Top