Shoot me your email addy pm , text or however and will blow them over to ya


You are using an out of date browser. It may not display this or other websites correctly.
You should upgrade or use an alternative browser.
You should upgrade or use an alternative browser.
Stinker Lowering kit
- Thread starter SRT10VENOMOUS
- Start date
thats spuds on a qc, you dotn have to notch them on a qc witht he springs he had, on the rcs its different from truck to truck, I usually notch them at the time of replacement , that way we dont ahve to remove the upper control arm again,
all you do is mark where the bolts are now, either with a scrib or some shoot paint on them to keep there present location
remove the upper control arm
with a die grinder, elongate the upper slot for more movement about .250 , then reinstall and take to alignment shop , then they should have enough movement to align if the xtra room is needed
so about 1/4 inch and elongate towards the motor or towards the outer side of the truck
towards the outside, what happens is the tire tilts inward, grindin out a bit towards the fender lets them move the upper control arm out, thus top of tire out, camber back in place, you want it about 0 camber , unless your chubby size then go a bit on the plus side, but they seem to like 0 camber and we usually pull them back a couple on caster to make them not so jumpy
does anyone know what the exact measurement of the rear lowering blocks are suspost to be for the lowest of tonys lowering kit....
the blocks i have here are only 2.5inch i thought he had a kit that was 3.5 inch or something like this.. ?
the blocks i have here are only 2.5inch i thought he had a kit that was 3.5 inch or something like this.. ?
3 inch is as low as I go on them
Flip
Full Access Member
Thanks for the info tony
ok i have the 2.5 can you see much difference with the extra 1/2 inch going to 3?
Flip
Full Access Member
beer!!!!!!!!
Yea, what he said...:rock:
amtrucker22
Active Member
hahaha... Purple writing = Spud instructions 
ok i have the 2.5 can you see much difference with the extra 1/2 inch going to 3?
a slight rake is the only diff
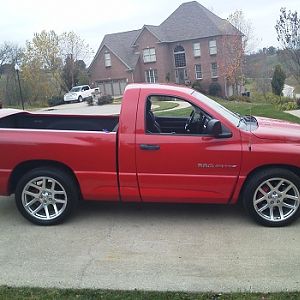
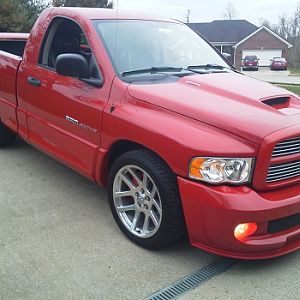
well shes done
looks awesome.
Soooo here is what i did.
For the front end,
1- took out inner fenders
2-took off nut to hold sway bar, and poped off,
3-took off upper a arm and held it up with rope to the fender support,
4- droped out the shock
5- lowered down the entire a arm set up with a jack,
6- poped out spring,
7- put in new sping
8 jacked back up a arm
9- reamed out upper a arm slots
10- removed bumpstop with grinder and hammer
11 install new bump stop
12 paint everything black
13- re attach everything
Done..
no balljoint fun involved
rear
1 - jacked up-
2- took off 4 bolts from ubolts,
3- took prybar hammered it inbetween axel and springs, poped apart
4- put in lowering blocks
5- ubolts would not fit into holes in bottom bracket, reamed them out
6- put in new ubolts, and new hardware, with lock nuts and washers
7 - droped her down
done like dinner..
over all it was a easy install, easy to do with one person as long as you have the proper equipment,
Support Us
Become A Supporting Member Today!