I forgot to check on this before I say certain. I will be there tomorrow at 478-922-4953 or Taliban Dan's cell 478-922-4953. Call me and I will check and go thru step by step if you want.Sharpimage said:How hard was it to take the front dash apart? got any tutorials?
I'm gonna get an iPod connector for my truck soon and was wondering
what all i need to do to get the dash apart.
Sharpi


You are using an out of date browser. It may not display this or other websites correctly.
You should upgrade or use an alternative browser.
You should upgrade or use an alternative browser.
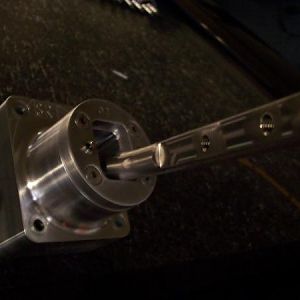
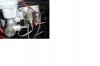
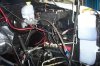
Pulling Engine - Let me know if there is anything you want measured or a picture of
- Thread starter Bone
- Start date
Sharpimage
Full Access Member
Cool bro, i'll probly get it in a week or two. i'll call you about it ")
Sharpi
Sharpi
Dominick572
Full Access Member
- Joined
- Jul 25, 2006
- Messages
- 1,787
- Reaction score
- 0
Sharpimage said:How hard was it to take the front dash apart? got any tutorials?
I'm gonna get an iPod connector for my truck soon and was wondering
what all i need to do to get the dash apart.
Sharpi
Hey bud, I did this a couple months ago....
http://www.vtcoa.com/forums/showthread.php?t=4154&highlight=Ipod
Should take care of everything your looking for.
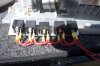
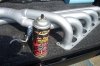
ARP head bolts! Took quite awhile to find these. They are the best head bolt/stud system I know of out there. A product worth considering with Forced Induction and/or NOS.
Found them through Jason Catzada at Racing Solutions, Inc.
281-752-9600
If you call ARP you will NOT find them and will be told they have not been made for the Gen 3 Viper. When in fact, they have been, and the maker is Jason at RSI. There was some proprietary issues between him and ARP, you would have to ask him for all of the details. However, here is what you need:
ARP # 247-4201
Dodge Viper
91-93 HSK
$335.00 (+ $14.14 ship)
Attachments

Last edited:

Sharpimage
Full Access Member
Dominick572 said:Hey bud, I did this a couple months ago....
http://www.vtcoa.com/forums/showthread.php?t=4154&highlight=Ipod
Should take care of everything your looking for.
Funny you mentioned that.
I was looking at that thread a couple days ago.Just looked at it again and it now makes sense to me :rock: :rock:
I'll pm you if i got a questions.
Thanks,
Sharpi

Sharpimage
Full Access Member
Sweet dude. Can someone explain to me briefly what the diffrence is between cold and hot plugs? i know its written up in detail but i'm too
lazy to look.
lazy to look.
Basically, Colder plugs are for Forced Induction and NOS applications.
Temperature of plugs refers to how easily the plug can transfer the heat absorbed from combustion to the cylinder head. Hotter plugs either have thinner porcelain jackets around the electrode, longer porcelain jackets, or both (when compared to a colder plug of the same manufacturer). The thinner the porcelain is, the less heat it can absorb and so the less heat it can transfer from the electrode tip to the metal body of the plug, and likewise, the longer it is the harder it becomes for heat to transfer from the tip to the body. The more power you make from a given size engine, the more heat you are creating from combustion, which means that the plug is exposed to greater temperatures during engine operation. The different heat ranges allow you to keep the spark plug’s tip at the proper temperature for reliable operation; too much heat and it wears excessively (and can cause pre-ignition), to little and deposits will form that eventually prevent the plug from creating a spark. So know that as you increase the heat of combustion, you must move to progressively colder plugs to keep the plug tip at the right operating temperature. More information can be given later on how to know when a colder/hotter plug is needed.
Temperature of plugs refers to how easily the plug can transfer the heat absorbed from combustion to the cylinder head. Hotter plugs either have thinner porcelain jackets around the electrode, longer porcelain jackets, or both (when compared to a colder plug of the same manufacturer). The thinner the porcelain is, the less heat it can absorb and so the less heat it can transfer from the electrode tip to the metal body of the plug, and likewise, the longer it is the harder it becomes for heat to transfer from the tip to the body. The more power you make from a given size engine, the more heat you are creating from combustion, which means that the plug is exposed to greater temperatures during engine operation. The different heat ranges allow you to keep the spark plug’s tip at the proper temperature for reliable operation; too much heat and it wears excessively (and can cause pre-ignition), to little and deposits will form that eventually prevent the plug from creating a spark. So know that as you increase the heat of combustion, you must move to progressively colder plugs to keep the plug tip at the right operating temperature. More information can be given later on how to know when a colder/hotter plug is needed.

Sharpimage
Full Access Member
Sweet, Thanks for the info :rock:
Sharpi
Sharpi

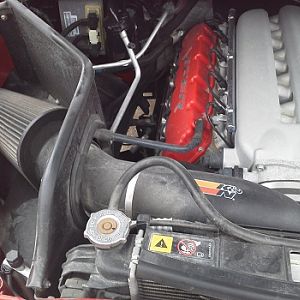
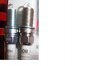
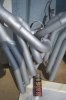
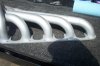
Headers re-coated with DEI High Temp Silicon coating (rated to 1500 F). I had one chip out of my Belangers, so I decided to recoat them myself.
Attachments

Begood
Full Access Member
Very nice.:rock:
Bill.
Bill.
I only see 1 picture in each set you sent :dontknow: :rock:
Black1
Full Access Member
Your my favorite Photog, Bone. :rock: :rock:
:rock: :rock:DRamSrt10
Full Access Member
If maybe you can give me some pix on how to take intake manifold off to install the msd wire and add some arrow point the bolts THANKS! What the headers is that? belangers and where did u get these DEI High Temp Silicon coating?
THANKS! What the headers is that? belangers and where did u get these DEI High Temp Silicon coating?Sharpimage
Full Access Member
DRamSrt10 said:If maybe you can give me some pix on how to take intake manifold off to install the msd wire and add some arrow point the bolts
:rofl: , i saw your post wondering about how to take the intake manifold off.
Maybe he'll give you some pix :rock: :rock: I personally would like to know
myself.
Sharpi
Support Us
Become A Supporting Member Today!